/
Create Facebook Application
Create Facebook Application
- RecordPoint (Unlicensed)
- Laura Boustany
Owned by RecordPoint (Unlicensed)
RecordPoint utilises the Facebook Application Programming Interface (API) to connect to your organisation’s Facebook wall and retrieve records. This requires the creation of a Facebook application via the https://developers.facebook.com website.
The steps in this guide were correct at the time of publishing. Changes to the Facebook application creation process may subsequently occur. If this is the case we recommend that you review the Facebook Developer documentation at https://developers.facebook.com/docs.
Follow these steps to create a new Facebook application:
- Navigate to https://developers.facebook.com and sign in with your organisation’s Facebook Account. You may need to register for a developer account if this has not been done previously – click the ‘Register’, in the top-right corner, and follow the simple steps.
- From the ‘My apps’ drop-down menu, in the top-right corner of the screen, click ‘Add a new app”.
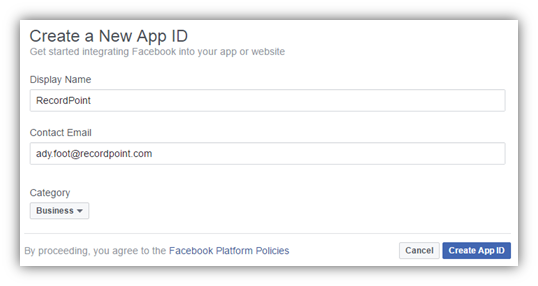
- On the ‘Create a New App ID’ form:
- Enter a name for your Facebook App.
- Enter a contact email address (not especially relevant as, ordinarily, this is for users of your app to get in touch with you).
- Select a category – we suggest ‘business’.
- Press the ‘Create App ID’ button.
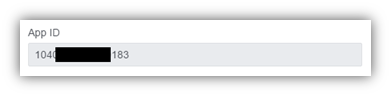
- Once your app has been created, navigate to the App Dashboard by following the link at the top of the left-hand menu.
- Make a note of the AppID that is shown in the dashboard heading and record it as your ‘Consumer Key’.
- Click the ‘Show’ button, alongside the App Secret field, to reveal the code. Make a note of this and record it as your ‘Consumer Secret’.

- Click on ‘Tools and Support’ from the link in the top-right corner of the screen. On the subsequent page, from the left-hand menu, click on ‘Graph API Explorer”.
- We now need to generate a User Access Token by clicking the ‘Get Token’ button and then selecting ‘Get User Access Token’ from the drop-down menu. This is the methodology that authorises the RecordPoint Connector to retrieve information from Facebook.
- Ensure that you select the permissions detailed in the image below and then press ‘Get Access Token’:
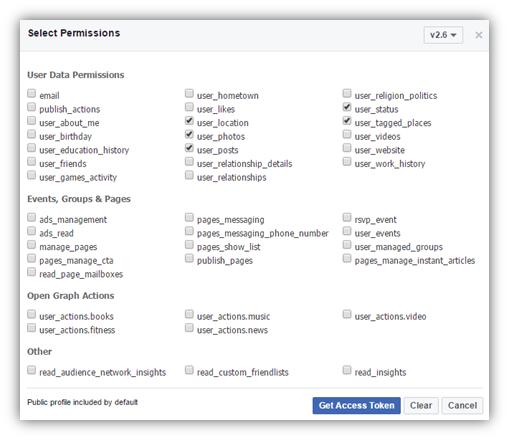
- The page will refresh and a User Access Token will now be displayed in the ‘Access token’ text field. Make a note of this value and record it as your ‘Access Token’.

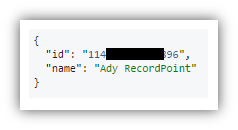
- Next, click the ‘Submit’ button. This will result in some text being displayed in the large grey box on the screen. Make a note of the value that appears alongside “id”: and record this as your ‘Facebook ID’:
, multiple selections available,
Related content
Prepare Facebook Installation
Prepare Facebook Installation
More like this
Prepare Twitter Installation
Prepare Twitter Installation
More like this
Prepare Yammer Installation
Prepare Yammer Installation
More like this
Getting Started
Getting Started
More like this
RecordPoint 4.19
RecordPoint 4.19
More like this
Creating and Using Permalinks
Creating and Using Permalinks
More like this