/
Create Twitter Connector in RecordPoint
Create Twitter Connector in RecordPoint
- RecordPoint (Unlicensed)
- Laura Boustany
Owned by RecordPoint (Unlicensed)
Follow these steps to create the SocialConnect connector for Twitter within the RecordPoint system:
- Navigate to your RecordPoint system and ensure that you are logged in with an account that is a member of the ‘Record Administrator’ security group.
- Hover the mouse over the ‘Management’ menu and click ‘Settings’.
- From the ‘Application Management’ section, click ‘Connectors’.
- Click the ‘New Item’ link.
- The ‘Configure Connector’ dialog appears.
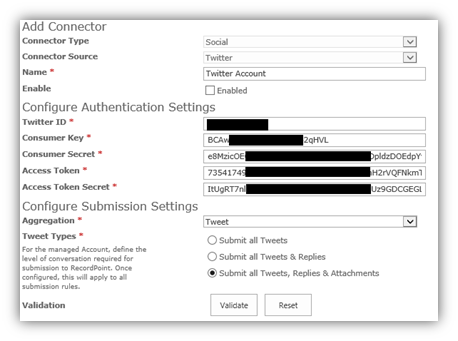
- Select ‘Social’ from the ‘Connector Type’ drop-down.
- Select ‘Twitter’ from the ‘Connector Source’ drop-down.
- Enter a name for the new connector – Twitter feed or similar will suffice. This is just an internal RecordPoint name for the connector and bears no significance.
- Enter the Twitter ID (Twitter account without the @), Consumer Key, Consumer Secret, Access Token and Access Token Secret.
- Select the ‘Aggregation’ setting you decided upon in previous step.
- Select the ‘Tweet Types’ setting you decided upon in previous step.
- Pressing the validate button will verify that RecordPoint is able to connect to the Twitter service using the details specified. Should the validation fail, please carefully review the values you entered above and try again.
- Select Poll interval
- Click Save
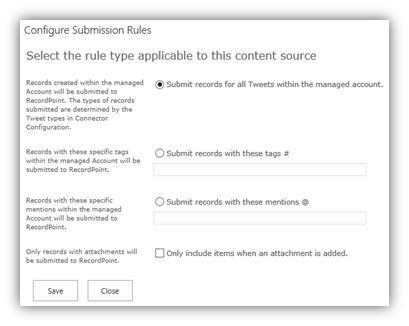
- Add the necessary ‘Submission Rules’, that you decided upon in Step 2.4, by clicking the ‘New Item’ link.
- Once you are happy that you have configured the connector correctly, check the ‘Enabled’ box (under the Connector Name) and, finally, press the ‘Save’ button.
It is recommended that an IISRESET and restart of the SharePoint Timer Service is undertaken at this stage.
, multiple selections available,